Book An Inspection
or call (410) 886-7000
or call (410) 886-7000
At Hometown Inspections, we understand the critical role that real estate agents play in guiding clients through the home-buying process. We want you to know that we aim to partner with you to provide thorough, reliable home inspections that help ensure smooth transactions and satisfy clients.
With over 20 years of experience, led by our founder, Robert C. Davis Jr., a former Contractor and Army Sergeant, we bring precision, discipline, and a deep understanding of the home’s major systems to every inspection. We stand out by using cutting-edge technology, including Spectora reporting software, to deliver fast, easy-to-read reports so you and your clients can make informed decisions with confidence.
We’re here to make your job easier—offering flexible scheduling, fast turnaround times, and clear communication every step of the way.
The home inspection process, from the scheduling phone call to referencing the report after closing, is a major aspect in your client’s satisfaction. At Hometown Inspections, our goal is to provide you and your client peace of mind throughout the selling and buying process. Your client’s home is a complex network of plumbing, electrical, HVAC and structural systems. Our mission is to extend to you our years of experience and extensive training on these systems in order to make an informed decision when aiding your client in buying or selling their home. We inspect, advise, and educate you and your client during the home inspection through our knowledge, highly rated customer service and our modern reporting software.
At Hometown Inspections, we know that real estate agents play a vital role in the home-buying process. That’s why we’re committed to providing you with the tools, insights, and resources to help you better serve your clients and navigate home inspections with confidence.
We created this quick-reference guide to make home inspections simpler and more transparent for real estate professionals. Whether you’re preparing a seller, guiding a buyer, or negotiating after an inspection, this guide will help you:
✅ Understand key home systems and what inspectors look for
✅ Spot common inspection red flags and how to address them
✅ Navigate post-inspection negotiations with confidence
✅ Set expectations for buyers & sellers to keep deals moving forward
✅ Be a trusted resource by providing expert guidance to your clients
🔗 📥 Download Your Free Copy Here: Home Inspection Pocket Guide for Agents
When you work with Hometown Inspections, you get more than just an inspection—you get a dedicated partner who helps make your transactions smoother, stress-free, and successful.
🏡 Comprehensive, easy-to-understand reports – Delivered promptly so you can take action quickly.
🔍 Experienced inspectors – Trained to identify issues clearly, helping prevent unnecessary deal-breakers.
📄 Agent-friendly service – We focus on clear communication to keep you and your clients informed.
📢 Educational resources – We provide ongoing support & insights to help you navigate inspections with ease.
Welcome to the Hometown Inspections Real Estate Agent’s Guide to Home Systems. This comprehensive reference is designed specifically for real estate professionals, offering a clear and accessible overview of the critical systems that keep a home safe, comfortable, and efficient. Understanding these systems—and knowing what to look for in each—empowers you to provide valuable insights to your clients, whether they’re buying or selling.
In today’s market, clients are more informed and interested in the details that contribute to a home’s longevity and efficiency. As an agent, your ability to discuss a home’s major systems knowledgeably enhances client trust and positions you as an invaluable resource. This guide covers everything from the foundation and roofing to HVAC, plumbing, electrical systems, and essential safety features, along with practical tips on recognizing common maintenance needs, expected lifespans, and potential issues.
In each section, you’ll find:
Our goal with this guide is to make system knowledge approachable, actionable, and valuable for you and your clients. Whether you’re assisting first-time buyers or seasoned homeowners, this guide equips you with the expertise to confidently answer questions, point out essential features, and add value to every property discussion.
Thank you for trusting Hometown Inspections to be your partner in providing exceptional service and expert advice to your clients. Let’s work together to make every transaction informed, seamless, and successful!
When will I receive the inspection report?
You can expect to receive the full inspection report within 48 hours after the inspection is completed. We prioritize quick turnaround times without sacrificing the quality or thoroughness of the report.
What does the inspection report include?
Our comprehensive reports include detailed findings on the condition of the home’s major systems, such as roofing, plumbing, electrical, HVAC, and foundation. The report will also highlight any safety issues, needed repairs, or areas that require further evaluation. Photos and clear explanations are provided to ensure the report is easy to understand.
Do you communicate directly with my clients, or do I stay involved?
We are happy to communicate directly with your clients or work closely with you, depending on your preference. We strive to be a part of your team, helping you provide a seamless experience for your clients while keeping you in the loop at every stage.
What if my client has questions after receiving the report?
We encourage clients to reach out if they have any questions or need clarification after reviewing the report. We are available to discuss the findings and help them understand the details so they feel confident in their decision.
What sets you apart from other home inspectors?
What sets us apart is our unwavering commitment to thoroughness, accuracy, and customer service. Our inspections go beyond simply identifying problems—we provide detailed insights and clear explanations that help realtors and their clients make informed decisions.
That’s why our founder, Robert C. Davis Jr., a former Contractor and Army Sergeant, has dedicated his 20+ years of experience and extensive training to developing an inspection process that leaves no stone unturned. With his background in construction and leadership, Robert ensures that every inspection is conducted with precision, discipline, and attention to detail.
Additionally, we provide fast turnaround on comprehensive reports and maintain open communication with both realtors and their clients to ensure everyone feels confident throughout the transaction. Our goal is to be a trusted partner, making the inspection process smooth, efficient, and informative.
How do you ensure your reports are easy to understand for my clients?
We use Spectora, one of the most user-friendly and advanced reporting platforms in the industry, to make sure our reports are clear and accessible. Spectora’s intuitive design allows us to provide high-quality photos, detailed descriptions, and color-coded sections that highlight issues by severity, making it easy for your clients to understand the findings at a glance.
Each report is structured to avoid technical jargon, and our recommendations are straightforward, ensuring even those without a technical background can easily follow along. Additionally, the reports are mobile-friendly, allowing your clients to review them on any device. We are always available to explain any findings or answer questions after the report is delivered, helping your clients feel confident and informed throughout the process.
Do you offer any additional services, such as radon or mold testing?
Yes, in addition to standard home inspections, we offer a variety of additional services such as water quality testing, termite inspections, septic inspections, and more. If your clients have specific concerns, we can tailor the inspection to include these services.
“Robert with Hometown Inspections is a wonderful resource to have as an agent. Professional, thorough, with a great knowledge of his craft from his previous contractor career. Always prompt, and quick to schedule as well ! ” Long and Foster Agent Will Brown
“5 Stars” – McClain Williamson Agent Katie Lowry
“Great Job Guys !!!! I will be sure to call you again” – Long and Foster Agent Mary Julie
“5 Stars” – Long and Foster Agent Blair Hendrix
“Was such a good experience. Really easy to work with, quick with schedule the inspections, and also the report it came so fast. Definitely recommend them.” Long and Foster Agent Ivaylo Angelov
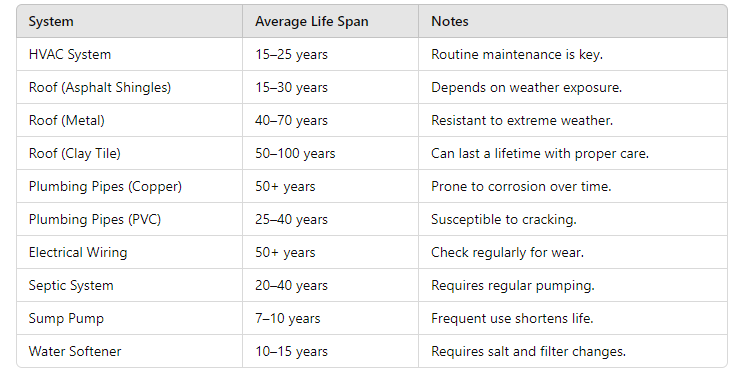
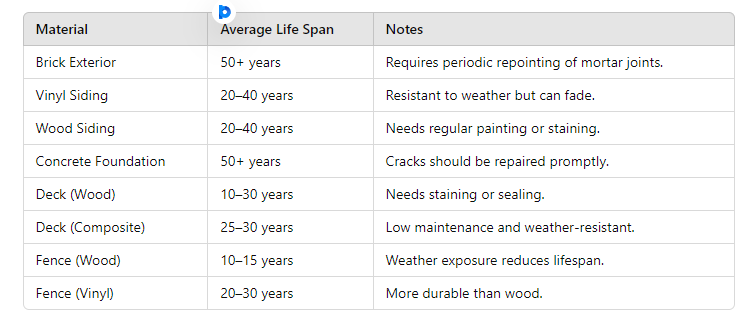
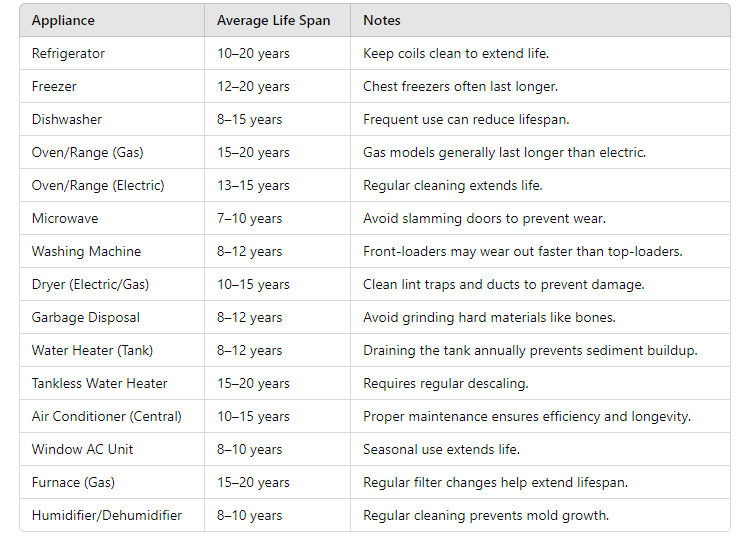
Here’s a comprehensive guide to the average life expectancy of common household appliances, systems, and materials. Keep in mind that proper maintenance can extend the lifespan of many items, while neglect can shorten it.
At Hometown Inspections, we understand the significance of staying informed about key elements within the real estate landscape. Therefore, we would like the opportunity to host a Lunch and Learn to speak to your Agents.
An INSPECTOR TALK session with Hometown Inspections promises immense value for your team of Real Estate Agents. During this engaging and informative event, Hometown Inspections will provide invaluable insights into the intricacies of home inspections, enlightening you on critical aspects of the real estate transaction process. By understanding the thorough inspection process, common issues, negotiation strategies, and emerging trends in the industry, we’ll better equipped you to guide your clients and ensure seamless, informed transactions. This collaborative learning opportunity enhances our knowledge base and strengthens our ability to serve clients, ultimately fostering improved relationships and trust within the real estate community.
We eagerly anticipate hosting you and your esteemed team at our INSPECTOR TALK visit, where we aim to foster a stronger partnership within the real estate community.
To set up a Date and Time for your INSPECTOR TALK email us at emily@hometowninspect.com OR Scan the QR Code below.

")